E Couloir of Le Luisin (2786m), Switzerland (29th March 2010)

Revelstoke is no more……. Well, it’s still there but I’m not. Spring was well and truly on its way before we left, so we decided to leave early instead of sitting around and I am now in Chamonix again! Oh yeah. Great to be back even if the endless crowds were a bit of a shock compared to what we’ve been used to in Revelstoke and the endless experts on anything and everything to do with mountains. Shut up!!!

I’m lucky enough to be here for the next three weeks but have not been so lucky with the weather. A lot of weather instability and snow is going to mean taking chances when they present themselves (safely of course) over the next week.

And today was one such day! Not in Chamonix but over in the Chablais region of the Swiss Alps. My good friend Sebastien de Sainte Marie suggested skiing the 400m NE Couloir of Le Luisin. Never heard of it but sounded like a plan, so I took the train from Argentiere to les Marecottes. Great to see him and be back skiing with old touring partners.

We took the chair lift up (got to love the lift access in Europe ;)) which took us in sight of the couloir for the first time and the first col we would have to skin up.

NE Couloir of le Luisin taken from the chair lift

NE Couloir of le Luisin taken from the chair lift

Col de la Golette

Col de la Golette

It didn’t take long before we were up the first col and descending down into the valley on the backside to skin back up and over to the Col D’Emaney. Good snow and a few nice turns. We were going to try a high traverse to avoid losing altitude but there was some big wind slab formations (I managed to release a small one on a convex roll with a crown 1.5m), so decided for the safe option and a longer skin.

Col d'Emaney

Col d'Emaney

Once to the Col d’Emaney, it’s a fairly long ridge walk up to the summit of the Le Luisin. It took us 2 to 2.5 hours but we were and had been breaking trail all day (sorry, Seb had been breaking trail all day!).

Seb near the summit

Seb near the summit

Me on the SW ridge of le Luisin. Courtesy of Seb de Sainte Marie

Me on the SW ridge of le Luisin. Courtesy of Seb de Sainte Marie

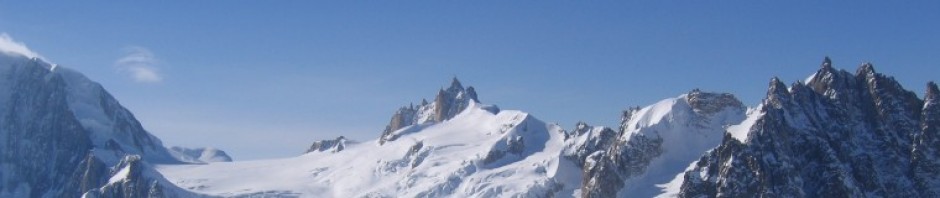
The mountains are stunning around here, offering amazing views. It was great to get a different perspective on Chamonix:

Chamonix views from right to left: Mont Blanc, Aiguille Verte, les Droites, Les Courtes

Chamonix views from right to left: Mont Blanc, Aiguille Verte, les Droites, Les Courtes

We finally made the summit and tried to find the entrance to the couloir which was not too obvious. We worked it out in the end and got the ropes ready for a rappel in. We had two ropes of 30m for the rappel but it would probably be better to have two lots of 40m. We just about made it with 30m but had to down climb another 5m or so. Really nice rappel in on an almost vertical wall. Great atmosphere. I love couloirs!! By the way, you know when you are on the summit; there’s a big Cross and a weather station.

Seb on the summit

Seb on the summit

Seb rappeling into the couloir

Seb rappeling into the couloir

Me rappeling into the couloir. Courtesy of Seb de Sainte Marie

Me rappeling into the couloir. Courtesy of Seb de Sainte Marie

And then the fun begins…… The couloir is in the low 40′s and had some great snow in it in sections. A bit crusty in places but hey. Nice turns had by all and then home.

Nice turns (Seb)

Nice turns (Seb)

More nice turns (Seb)

More nice turns (Seb)

What we thought was going to be a quick tour turned out to be a lot longer. As a result we missed the last lift down and had to ski and then walk a lot of the way. The boot bang on my poor fragile toes was really enjoyable….. It probably took us around 7 hours from putting skins on at the Col de la Golette to hitting the trail down.

Highly recommended (but then I suppose it wouldn’t be on here if it wasn’t!)

For more trip reports in Switzerland, click here.

Share
Posted in Chablais Alps, Switzerland, Switzerland | Tagged , , , , , , , , , | 2 Comments

Jupiter Traverse and the Thorington Descent, Rogers Pass (20 March 2010)

I met up with locals Karkis and Joey for a great day up at Rogers Pass. Conditions were starting to settle and the snow was drying out from the recent high freezing levels to offer some great powder skiing, a little wind blown in places but who cares.

Splitters rule! All three of us were on splitboards with the Dynafit setup. It’s actually thanks to these guys in a short film on Greg Hill’s site that I even came across this set up. It makes such perfect sense when you think about it. But I hadn’t until I saw these guys using it. Genius.

We headed up the Asulkan trail unsure of the day’s object, a few possibilities on offer: the Forever Young Couloir (my nemesis), over Sapphire Col and into the Lilly Glacier or the Jupiter Traverse. We plumped for the slightly “cockier” option of the Jupiter Traverse, a Rogers Pass Classic which both Joey and Karkis had done eight times between them. At least I was in good hands.

Pollux, Leda and Castor from left to right courtesy of Joey Vosburgh

Pollux, Leda and Castor from left to right courtesy of Joey Vosburgh

The tour involves skinning up to Sapphire Col and then climbing Castor Peak, Leda Peak (with a sketchy downclimb of Leda Peak) before finally climbing Pollux and getting the board on your feet (my favorite bit) and boarding down the Thorington Descent.

Castor Peak. Start of the traverse. Courtesy of Joey Vosburgh

Castor Peak. Start of the traverse. Courtesy of Joey Vosburgh

Me and Karkis on the traverse. Courtesy of Joey Vosburgh

Me and Karkis on the traverse. Courtesy of Joey Vosburgh

Boarding down the first steep section from Pollux was magic, with great snow…..,  just not long enough. After that it was a nice cruisy board back down varied pitches to the Mouse Trap where the real fun began. These guys have skiing out in split mode down to a tee. Something I definitely need to work on.

Karkis descending the Thorington. Courtesy of Joey Vosburgh

Karkis descending the Thorington. Courtesy of Joey Vosburgh

It was a long day and my first real tour for a month after recovering from frost bite. We were on the go for a total of 8 hours and a vertical gain of 1900m/6200 feet.

For more trip reports in the Revelstoke area, click here.

Share
Posted in Revelstoke, Selkirks, British Columbia | Tagged , , , , , , , , , | Comments Off

Balu Pass (2070) Rogers Pass (19th March 2010)

Avalanche danger has been pretty bad for the last week or so with spring coming very early to Revelstoke and Rogers Pass. Freezing levels have been as high as 2000m at times and there’s been a handful of deaths (slednecks for the most part, I’m sad to say). So, me and my girlfriend thought we would go and check out the lay of the land after things had quietened down on some low angle terrain which is relatively safe. Balu Pass in the Connaught drainage is great for this and was a nice first easy tour since recovering from frost bite.

Balu Pass

Balu Pass

Although the tour is very low angle and short, it does take you through some potentially very big avalanche paths, so beware. On this occasion, something had ripped on pretty much all aspects, so things were pretty safe. The only aspect that wasn’t sun-baked and offered some nice fluffy turns was the East aspect which we were going to ski. Nice!!

Approaching Balu Pass with sub-peak of Ursus Major

Approaching Balu Pass with sub-peak of Ursus Major

We left the car at 13.00 and were at the top of the pass for 15.40 to enjoy amazing views and get my first really good look at the drainage and beyond for the first time. The main reason for the post is to get some nice pictures on here for others to use for trip planning.

Looking from Balu Pass

Looking from Balu Pass

Balu Pass is the first of three cols in “The Three Cols Traverse” continuing on to the Cougar Pass and then onto the McGill Pass along the Bostock Creek and out at the Bostock car park. Sounds like a nice traverse and definitely one on the to do list.

Views towards Cougar Pass

Views towards Cougar Pass

It was a quick tour. 2.5 hours and 800m/2600ft

For more trip reports in the Revelstoke area, click here.

Share
Posted in Revelstoke, Selkirks, British Columbia | Tagged , , , , , , , , , | 1 Comment

Grizzly Mountain Couloir 2757m (8th February 2010)

It’s been a long month of reading, watching the tele, pulling my hair out, watching the tele…. oh and reading since my toes got frost bitten. I’ve finally managed to get some boots back on, getting the toes punched for better circulation and investing in some boot warmers (I hear they are not supposed to be very manly…. Whatever!). First full day back on the hill yesterday. Tootsies are a bit sore but I think we are back on…..

Well, I did promise some more trips reports during my convalescence but the truth is, I didn’t really take any decent pictures while I was doing them (not having a blog in mind at the time), so I’ve scrounged around a bit and may be able to cobble a couple together to make this text a bit more interesting.

So, as already mentioned, I’ve been struggling for touring partners all season (the dangers of coming to a new place and not knowing anyone. Maybe I should have stayed in Chamonix……). I was checking out Greg Hill’s blog as I tend to do for good beta and saw that he’d been up Grizzly Mountain a few days previously. Conditions hadn’t changed much since his outing, so I felt good going up there on my own. I don’t know why but I love couloirs, so there was no other line for me than the couloir on the south face of this mountain.

Grizzly Couloir

Grizzly Couloir. Photo courtesy of Greg Hill

You can actually get a good view of the couloir just before you pull into the Rogers Pass centre on your way from Revelstoke.

Grizzly Couloir from the NRC car park

Grizzly Couloir from the NRC car park

It’s straightforward to get to: from the Rogers Pass Centre into the Connaught Drainage following the beaten track over the bridge and then passed Grizzly Shoulder and the first avalanche run out from Grizzly bowl and then straight into the next set of trees (I think it’s called Teddy Bear Trees). This is the safest skin up with little exposure and once you pop out of the trees you are nicely set on the ridge to take you up to the summit.

Sir Donald on the way up

Sir Donald on the way up

It was a nice skin up and I was on the summit in reasonable time to enjoy a blue bird day. The entrance to the couloir was dipping in and out of wispy cloud, so I grabbed a window of better visibility to enter the couloir and saw Greg’s tracks.

Entrance to Grizzly Couloir

Entrance to Grizzly Couloir

And that’s where the day became less pleasant. It was sun-baked and rutted from the few tracks that had already been down it. There were small pockets of powder to skier’s right where the sun hadn’t got to it but it was a pretty terrible, bone-jarring ride down! Oh well, at least I was getting fitter for the rest of the season….. (or so I thought!). I would love to ski this couloir in better condition. Barring conditions, it was a fantastic line.

So, some stats (4th tour of the season):

Total ascent: 1550m/5100ft

Time up: 4hr from car.

For more trip reports in the Revelstoke area, click here.

Share
Posted in Revelstoke, Selkirks, British Columbia | Tagged , , , , , , , , , , | Comments Off

Mt MacPherson and The Womb, Revelstoke, Canada (3rd & 5th February 2010)

Right…. so this blog is supposed to be about being out in the mountains, snowboarding and just generally having a nice time. It’s been a bit difficult with frost bitten toes of late but I managed to get shoes on for the first time today and ski boots are surely not far off. Wahoa! Bring it on… In the meantime, here’s the first of a few trips I made before I became house-bound and annoying….

Mt MacPherson and the Fingers and the Womb

Mt MacPherson and the Fingers and the Womb

The Fingers are a classic in Revelstoke; easy to get to and easy to lap for some short turns and “the Womb” (I think that’s what the locals call it) from the summit is a great line. This picture was taken from Revelstoke Mountain Resort. Conditions weren’t ideal when I set out solo from the Nordic Ski trail car park but I knew there was a skin track up to the summit. That was before it had snowed, so I ended up having to break trail for most of the way in heavy snow on the lower sections. Up the Fingers and then continuing up onto the ridge, interspersed with a bit of boot packing on the last pitch. The last section gets pretty steep and I found it tricky with the wide boards, hence the boot pack but it does go all the way to the ridge. It was an uneventful skin to the summit and the route finding was pretty easy despite the lack of visibility. Just keep going up……. This is the view from the summit:

Mt. MacPherson Summit in a complete whiteout

Mt. MacPherson Summit in a complete whiteout!

So, apologies for the lack of photos but conditions weren’t really playing along. But then they hardly ever seem to in Revelstoke. This place is constantly socked in in the winter (at least while I’m here!). Fortunately, I was able to follow my skin track off the summit and enter into “the Womb”. Lovely line! I took a steeper pitch off the natural entrance and the snow was great. Bit of sluff but just perfect. It’s such an aesthetic line looking back over your shoulder, entombed by sheer walls on either side which converge to force you through into the next opening. Nice! It was over a bit too soon to be honest and the great boarding was greeted with the usual bush whack out. I’ve done this one twice now. Beware: if you ever do this line, try and stay skier’s right of the brook all the way down through the trees. Still a bush whack but tolerable. Skier’s left was an absolute nightmare. Rediculously tight trees. Alright for you skiers probably but not on a board. There were some choice words!

So, some stats ’cause I know you North Americans like your stats (3rd tour of the season):

Total ascent: 1800m/6000ft

Time up: 4hr 50 min from the car

For more trip reports in the Revelstoke area, click here.

Share
Posted in Monashees, British Columbia, Revelstoke | Tagged , , , , , , , | 2 Comments

Gram Counters…… (Jetboil Flash)

When I’m skinning, I tend to sweat a lot, so avoiding dehydration is quite a big thing for me. It has many negative implications:

  1. They say that when you lose 2% or more of your body weight in sweat, you reduce your performance by between 10% and 20%. Now, I weigh around 100kg, so that’s 2 litres of water which sounds like a lot but in reality it’s not and it can go faster than you think, so, all of a sudden, things are much harder work, I’m slower and I’m not enjoying myself as much.
  2. Not only that, as you dehydrate, you lose electrolytes  (sodium, potassium, magnesium e.t.c.) which are essential for your body to be able to transport water to and from your major organs. If you exercise for anything up to 45 mins, this isn’t a problem but when you start doing endurance sports (I suppose skinning is endurance), it’s important to replace the electrolytes, especially if you are an “excessive” sweater like me (I don’t seem to have much going for me!), as you lose much more salt and become dangerously dehydrated. Before I started using sports drinks, I used to have trouble retaining water even though I was sweating and drinking like crazy. I would continually need to pee. It didn’t make sense. Then I learnt that as I continued to sweat, my sodium levels were becoming depleted. And I was diluting them even  further by drinking just water. Work that one out. Of course, I’ve since learnt that sodium is needed in order to retain liquids. Aha! So, sports drinks were the answer and have made a world of difference for me during and post exercise, especially in recovery.
  3. And of course dehydration will not do you any favours in staving of hypothermia in cold climates and frostbite.

So, drink (and not just water, add a sports powder)! I try and have a drink every 25 mins while I’m skinning and never wait until I’m thirsty (that is when you are dehydrated!). As I lose so much liquid, I end up carrying a fair amount too. And water is not that light either. Depending on the length of skin, I’ll carry at least two litres in a Camelbak and more often than not an extra litre in a Nalgene bottle. So that’s 3kg of liquid. Thankfully, as the day progresses it disappears…..

So, how could I save a bit of weight (questionable) and have more water….? Maybe a nice little stove. I was looking at the Jetboil and thinking, wow what a nifty little stove. Wouldn’t that be great if:

  • the proverbial hits the fan and I’m benighted
  • I want to have something warm to eat/drink when I’m cold or mix up the boring granola bars/GU with e.g. noodles
  • I’m out of water and need some more (especially if the proverbial hits the fan)
  • Camelbak splits/freezes
  • I’m solo (of course!)

The problem with all this gear is weight and where to draw the line. You could never have enough gear if weight wasn’t an issue but it is and it soon adds up. Shaving weight is a favorite past time for anyone in the mountains and I think I’ve managed to do that and get a Jetboil into the bargain! Ha! Leave the Nalgene bottle and a litre and half of water at home and melt any additional water needed on the way (I know, I’m a bit slow. Climbers do this all the time).  That’s a saving of ca. 1.6kg and a gain of around 600g with the gas canister included. A saving of 1kg at the start of the day and a gain of 440g at the end of it. The Jetboil Flash is supposed to be pretty speedy too, so should get enough water melted in a 15min break. Obviously, not the best solution for days where speed is of the essence but a good addition to the arsenal.

For those interested in the lightest stove combo and efficiency, check out this link: http://thehowzone.com/how/jetboil/8 (Jetboil Vs. Pocket Rocket with titanium Trek 700). The Jetboil wins comfortably.

And for comparisons to the MSR Reactor which is better than the Jetboil Flash in some instances but not for what I want, check out this link: http://www.trailspace.com/articles/2007/01/17/integrated-canister-stove-showdown.html

If you can think of improvements, it would be great to hear them.

For more gear reports, click here.

Share
Posted in Gear | Tagged , , , , , , , , , , | Comments Off

“Adventure is a sign of Incompetence”

I came across this quote while I was reading a really good book about Scott and Amundsen and their race to the South Pole. It’s written by a Brit (Scott and Amundsen: The Last Place on Earth by Roland Huntford) and portrays Scott as an arrogant, self-absorbed, bumbling Englishman and the Norwegian, Amundsen as well…..pretty flawless.  Reading the book, its very hard to disagree and certainly dispels every English boy’s image of Scott as a travailing hero. In the context of the above quote (by the Icelandic Canadian arctic explorer Vilhjalmur Stefansson by the way), he comes across as very incompetent! Amundsen’s reaching the Pole was so uneventful and matter-of-fact, so well prepared and organised. It was almost boring and undermined his achievement. Who do you think of first when you think of the South Pole? Scott or Amundsen? I couldn’t even remember the Norwegian fella’s name?!

Admittedly, Scott’s story is a lot more entertaining, nail-biting, dramatic, enthralling e.t.c. (everything Hollywood bosses try to squeeze into those sh”t blockbusters), fulfilling all the criteria of a modern-day hero, even if he did die!  Every Alpha male worth his salt is brought up on this fodder and we try to emulate it in one way or another (and there’s a fair few of us in the mountains, in fact everywhere!). Bragging rights and great stories in the bar. When I was younger, I single-handed the Atlantic with almost zero sailing experience. I made it but not without a few serious mishaps, all of which made for great stories and made me “a bit crazy but cool”. When I read this quote last year, it stopped me in my tracks and really put new perspective on what I’d done. I was very, very incompetent. There is nothing cool about that. I would probably never do it any other way but it does make the point.

I was thinking about this after getting caught out the other night. Thankfully, I was pretty well prepared and the experience would have been very unadventurous, had I not got the ends of me’ toes bitten. Watch out for critters. They are everywhere.

So, I’ll be keeping this quote at the forefront of my brain whenever I go out into the mountains. God, I’m getting sensible…..and older…. Oh no!!!

Share
Posted in Random Thoughts | Tagged , , , , , , , | 2 Comments

Survival Bivy Bag

So the unexpected benightment the other day made me think about how I could have improved my night out. A spare pair of socks is an obvious one and I will not leave home without them from now on.

The one thing that I really wished for was for my survival blanket to have been in the form of a bag. Like I said, it really did make a difference as it was but a bag would have made an even bigger difference. So I have done some research……

When I bought my survival blanket in my very first season, I put it in my bag and forgot about it. I even forgot about it for the first hour when I got benighted! Needless to say, I hadn’t looked into this a huge amount, thinking a survival blanket would be sufficient and wasn’t aware that there were bivy bags made of space age material out there costing almost next to nothing.

Now I know and I will definitely be upgrading my space blanket to a “space” bag. I’ve got two on my short list. Weight and size are of prime concern for me and it will only serve as an emergency fall back. So, here’s what I’ve come up with:

Medical Adventure Kits:

  • Reusable: Yes
  • Weight: 196 grams
  • Length: 1.85m
  • Insulating: No
  • Reflective: Yes
  • Wind/Water proof: Yes

Blizzard Survival Bag:

  • Reusable: Yes
  • Weight: 385 grams
  • Length: 2.1m
  • Insulating: Yes
  • Reflective: Yes
  • Wind/Water proof: Yes

The Adventure Medical Kits bag seems to be a pretty standard emergency bivy bag and more durable than the standard space material. The Blizzard Survival bag, on the other hand, is supposed to be something quite revolutionary and it comes from Britain too. Wahoo!! According to the blurb, they developed what they call Reflexcell technology. This has “cellular construction to trap warm air, elastication which draws the material to the body, reducing cold spaces and heat loss by convection, and finally, silvered surfaces to block heat loss by radiation.” Their words, not mine. They even claim an 8 tog rating (as good as a 2 season sleeping bag). Even if it’s not that good, a bit of insulation is better than nothing, so this bag has seriously got my attention. It is heavier than the other bag but if it keeps me warm when I need it, 200g extra is not a huge price to pay. And it would completely cover me. I think I’m sold!

It’s a nice feeling to know you have that in your bag when the proverbial hits the fan. I’ll see if I can get my hands on one and follow up.

Let me know if you’ve come across anything better.

For more gear reports, click here.

Share
Posted in Gear | Tagged , , , , | 2 Comments

Frost Bite! (Forever Young Couloir)

So here goes my first post and I suppose I’m the bearer of bad tidings…..

I’m currently convalescing after getting frost bite on my toes after being benighted on the Illicillewaet Glacier two days ago. Not the most uplifting of posts but I suppose this blog is supposed to be warts and al’.

Forever Young

Forever Young

Skinning up the start of the 7 Steps of Paradise

Skinning up the start of the 7 Steps of Paradise

I was alert to potential slides and took a longer, more conservative route to get up the last section which avoided the Seventh Step. Very safe and low risk but a bitch to climb and I lost a lot of time boot packing in deep, faceted snow. When I got to the top of the bootpack, I realised I was on the wrong side to get to the summit ridge and had to descend the backside and skin back up. I had a bad feeling on this side and could see that a fair amount had ripped. It did not look good and I did not really want to be there. But now I was totally committed and was fast running out of time before it got dark. I still needed to find the entrance to the couloir which I found but losing more time.

The whole day just wasn’t turning out as I had envisaged: getting to the couloir had taken way too long, I was running out of day light and I was not feeling too good about the avalanche conditions. So, it was no surprise to get to the high side of the entrance  for it to rip down 15cm  about 30m across with me nicely sat on the bed. The first avalanche I’ve triggered of any real consequence and needless to say, I was pretty spooked. It didn’t make me want to enter the couloir but a purged couloir is also a safe couloir. Angelita was waiting for me a distance  away with a view of the couloir but couldn’t confirm via phone whether it had completely gone. With not much day light left, I had to make a decision: down the couloir or head down the Illecillewaet for the Youngs Peak Traverse. I just didn’t want to take the risk and decided on the Traverse, knowing full well that I might be benighted but hoping for a bit of luck in route finding.

No such luck. I’ve never been on the glacier before and could see it was fairly crevassed as I approached with hardly any light left, so the decision was an uncomfortable one but a no-brainer. Stay put and wait out the morning. Thank God for my space blanket. That really was a life-saver.

Overview

Overview

A long, cold night in a make shift snow cave but no big deal. I got down easily enough with the help of a skin track the next morning and made it to the Wheeler Hut in good spirits where Angelita was waiting for me. Unfortunately for me, we discovered that my toes had frozen overnight due to wet socks.

So here I am, going mad at the house waiting for my feet to recover. The official verdict is first degree frost bite with second degree frost bite on two toes but a full recovery looks to be on the cards. I’ve never been benighted but had all the necessaries just in case. I never thought spare socks would be part of that list but I will never leave without them now. It was a great learning experience under very forgiving conditions, with no wind and clear skies and a temp of ca. C -8. A real confidence builder if such a situation should ever arise again. Things don’t always go according to plan, especially in unfamiliar terrain and you’re not always going to have someone with you who’s done it before, so it’s essential to be prepared for the worse.

Needless to say, I’ve got a lot of time on my hands to get this blog going now which could be dangerous, so bear with me if I start going a bit off track!

Total Vertical skinned for the day: 1800m//6000 feet

For more trip reports around the Revelstoke area, click here.

Share
Posted in Frost Bite, Revelstoke, Selkirks, British Columbia | Tagged , , , , , , , | 9 Comments