
I’d bought a split board when I was in Canada in 03/04 for the season and had mixed results. I used my normal bindings and soft boots and found that it was not the best skinning on hard pack when I went back to Chamonix the following season. I bought a 178 too based on the logic that if I was boarding in the back country, then it would always be powder. Well, the board felt too heavy and unwieldy for technical sections and of course you experience all kinds of snow in the backcountry and more often than not hardpack in the high alpine environment of Chamonix. In short, the board was way too long and heavy.
So, it didn’t really work out for me and I went back to the joys of snowshoeing. But while I was surfing the net and looking at various sites, I came across Greg Hill’s site and saw that he was hanging about with quite a few splitboarders who were all on hardboots and Dynafit toe pieces. The idea of hardboots had occured to me before but for nothing more than a split second as it seemed to go against the whole concept of snowboarding and the sensation of powder. But seeing all these guys, and some of them ex pros, riding with hardboots, I realised that there must be something to it. I got more information from the Splitboard.com forum and decided to go for it.
Phantom Splitboard Bindings
All I can say is that I loved it and have never looked back! Going from snowshoes, it’s such a revolution in mountain transport for me. I am now almost on an equal footing with skiers on the up and so much lighter and faster and the descent is just as good as with soft boots with the right boot configuration. The boots do need some fine tuning and it definitely does take some getting used to but it is completely possible to replicate my softboot snowboard experience with all the advantages of hardboots.
One modification I did to the boots was to replace the original tongue of my boots to the much, much softer Scarpa Spirit 4 (the Spirit 3 is the same tongue too), bought directly from Scarpa for EUR30. It made the boot a lot more flexible. A big improvement. I´m yet to drill the touring mode bar at the back of the boot.
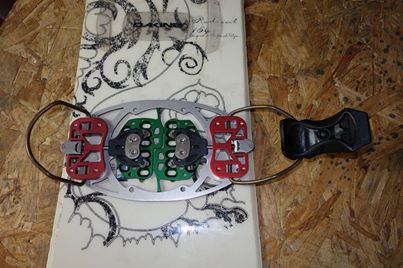
The bindings are, of course, an intrinsic part to a successful setup though. I started out with Bomber Bindings and the Voile plate that comes with the original setup. This worked pretty well but once you take into account the Voile pucks on the board and then add the Voile plate and then add the Bomber bindings on top of that, you are pretty high above the board. Another problem inherent with the Voile system is the movement of the Voile plate relative to the pucks, both forward and sideways. Sure, you can get everything nice and snug to the point where movement is minimal but things soon start to loosen up. That was at least my experience. The consequence of loose plates is of course that the two halves of the board also start to move and you have exasperated the classic compromise of a splitboard over a solid board; the ride, stiffness and responsiveness. Well, that was really the only option for a while until I discovered the beautifully crafted Phantom Splitboard Bindings.
Phantom Splitboard Bindings
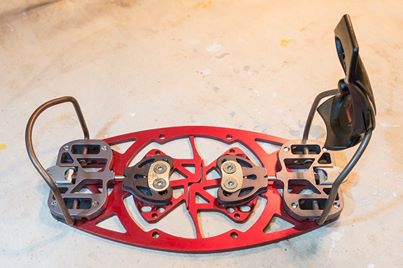
Phantom Splitboard Bindings
These were doing the rounds on splitboard.com and there was a lot of excitement surrounding them. And that excitement was warranted. Without wanting to exaggerate, this system is quite simply revolutionary compared to the Voile/Bomber combination. It resolves all the problems that system presented; the binding consists of a plate which connects directly to the board and the boot then to that, so you have maybe 8mm (the thickness of the plate) between your boot and the board. The design of the plate enables you to pull the two halves of the board tightly together, so there is no slop whatsoever. The ride is simply incredible compared to my old system. I´ve heard people claim that their splitboard rides like a solid board after incorporating board clips from Karakoram but was always sceptical that such a small change could have such a big effect. I can, however, say for the first time that my board does now ride like a solid board with the Phantom Splitboard Bindings in terms of stiffness and responsiveness (as best as I can remember. It´s been so long since I was on a solid board!). They are pretty amazing. Oh.. and they´re really easy to transition with…. oh… and they´re lighter than the Voile/Bomber system.. oh and the plates are made from aerospace grade aluminum alloys, heat treated steel bails, and stainless steel hardware. What´s not to like….?
Well, the only disadvantage they have is that they are made with such small tolerances to achieve the solid board feel which means that all the snow has to be cleared from the system for the plates to work. This is not a problem in dry powder as it just brushes away but becomes more of a nuisance with milder temperatures and heavier snow. But you cannot have it all! A small price to pay for such vast improvements in all areas in my opinion. You can get your whole set-up from them as I did. My set-up consists of:
- Prior Backcountry 168 with traditional camber
- Phantom Splitboard Bindings
- Dynafit Toe pieces and toe piece converters provided by Phantom Splitboard Bindings
- Phantom Splitboard Heel risers
- Dynafit Zzero 3 Carbon boots
Due to the increased stiffness, ridgidity, better edge control and responsiveness of the splitboard with the Phantom bindings over the Voile system, the decision as to whether to ride with soft or hard boots is no longer simply confined to the choice of footwear but whether you actually want a better performing board. That should convince a few more non-believers in the future of hardboots for splitboarding. Not only are hardboots better and safer for snowboard mountaineering, with the Phantom bindings you also get a better board.
Click here to go back to the home page and snowboarding descents…..

Pual,
Go on then, show us a picture of your set up, i have never heard of split boards with dynafits. very interesting!
good work on the blog.
D
Dave, mate,
Sorry it has taken me so long to get some pictures up. What can I say….. too busy boarding
Hey Paul,
So can you climb with those boots? What about splitboards with plastic mountaineering boots – maybe Scarpa Omegas? I’m tempted to try out a system, but…
Hey Apporva,
Well, the only climbing I’ve done in them has been in the realm is ski-mountaineering, so general rock scrambling and boot packing with crampons both of which were fine in my boots. But I am a snowboarder first before a climber and I haven’t done anything technical in them. So, I couldn’t really even guess what they would be like for general climbing or what a good climbers boot requirements would be and whether they would meet them. I’d say they’re fine for most ice climbing, definitely grade 4.
Not sure if that’s very helpful. Probably not. I think you’ll just have to try it. Hard boots and splitboard are definitely the way to go for touring though. That is for sure.
The best resource though would be the splitboard forum: http://www.splitboardlife.com/site/Splitboard_Home/Splitboard_Home.html. Other people have explored the possibility of climbing boots and splitboards there.
Great Blog
I’m out in Chamonix at the moment – my first season with a splitboard – a total revelation and a much better way into the mountains than on my old snowshoes.
But I need to do something about my bindings set up – at the moment I’m using a stiff (but still soft) Flow boot with a pair of Flow bindings.
All is good downhill on the deep snow but it’s a different matter in technical icy snow conditions and Oh My God – everything feels super heavy on the up hills.
Please post a picture of your hard boot set up – I also get to enjoy the mountains with skiers so it would be great to get rid of my excuses based on weight!
Cheers, Rick
Hey Rick,
Sorry it took so long to get the pictures up. Not the prettiest but hopefully they will give you an idea of how it works. And really glad that you like the blog. Precisely why I started it.
Not sure what board you have but if you are having trouble on technical, icy sections on the downhill, it could be that your edge is not acute enough (i.e. less than 90 degrees). I had problems with my board too in that respect but seem to have solved it now.
It looks like I had quite a large bottom edge bevel (1 to 2 degrees but could be way off). Either way, I put an 89 degree side bevel on the board with no effect whatsoever and then increased it to 88 degrees and I finally felt like a I had an edge. The board was just as you would expect. I have no idea what the total angle of my edge is now but I suspect that it was not 90 when I got it as the bottom bevel was too much.
I’m probably going to get the base ground when I get back to Oslo to reduce the bottom bevel to 0 and then start again so I know exactly what the angles are/ I’m going to aim for a total angle of 89 to 88 but will try it out each angle to see if it achieves what I want. That might be too much angle for some depending on riding but boarding steep, technical lines on hard snow, I want to know I can get an edge, so works for me.
A tip I got from another splitboarder on edges is to have a progressive side edge of say 88 under the waist to 89 or 90 towards the nose and tail to avoid catching an edge on steeps. I’ve seen this before on skis but makes sense. I will try it out.
Hope that helps and happy splitting!!
Hi Paul, quite cool setup!
How do you put on the crampons on the dynafit binding?
Dont forget to checkout my splitboarding web.
Thanks for the reply.
Hey Adam,
Thanks for getting in touch and a good question. I don´t actually have any ski crampons for my set up but it´s definitely on the Christmas list!
I´ve been in touch with Spark R&D about that and they recommended a company called B&D to me (http://www.bndskigear.com/).
Supposedly, they do really good crampons for the Dynafit setup. I hope to get my hands on some of those at some stage.
Let me know if you try them out. And give me the link to your site so I can have a look!
Cheers Paul
Hey Paul
I’ve decided to get in to splitting and I think I want to go the hard boots option – I’ve already got some Garmont Radiums.
I like the look of your set-up but I don’t get how it works – are you using Voile sliders with the bindings? If so why the Dynafits as well? Also did you have to drill the board at all?
Sorry for the dumb questions but I don’t want to order the wrong stuff.
cheers,
Martin
Hey Martin,
Nice to hear from you. Personally, I think splitboarding with hardboots is the way to go. I don’t know much about the Garmont Radiums but if you are coming from soft boots, then it’s important to get a “soft” hardboot so you can continue to feel like you’re in soft boots. All the advantages of the hardboot come on the up and with crampons e.t.c. If you’re unsure, definitely have a look at splitboard.com. The forum is really helpful and there are a fair few of us with the hardboot set-up.
Otherwise, to your other questions…….. When you buy your splitboard, it will come with all the necessary bits (at least my Prior did). Mine came with Voile plates to slide the bindings on, so I use those too to attach my Bomber bindings for hardboots. So, why the Dynafit toe pieces…? Well, I only use the Bomber bindings for the down, otherwise they stay in my bag for the up and I use the Dynafit toe pieces to skin up like a skier. So if you go for that system, then obviously you have to have Dynafit compatible hardboots. That’s the one real advantage of hardboots. If you’re not going for the Dynafit set-up, then you might as well stick with soft boots in my opinion.
Oh…. and I forgot….no drilling needed. Spark R&D make some great little plates which match the holes already drilled into the board, so you fix them on and then you have the three holes needed for the Dynafit toe pieces. Sweet! And they also sell the toe pieces on their own too, so you don’t have to buy the whole binding or hunt around for second-hand gear. That’s a good find!
Hope that helps. Let me know if you have any other questions.
Cheers for the reply Paul. I’m wanting hard boots for more technical climbing – I’ve already used the Radiums with crampons a fair amount.
They should be good for riding too I think – they’re a Dynafit compatible ski touring boot and you can vary the stiffness a bit.
I really want to keep weight as low as possible so I was wondering how skinning would be using the slider tracks / bindings instead of an additional Dynafit piece.
What do you think? Would there be enough clearance at the toe end to let the boot pivot up fully?
Hmmm…… You’ve got me there. Not really sure how that would work……? One thing to bear in mind with the weight issue though……. Admittedly with a Dynafit set-up, you are carrying the plates in your bag…..but with the set-up you are thinking of, you will have all the weight on your feet (plates and bindings. That’s around 1.5kg at a guess)… I know I would much prefer the weight in my bag than on my feet, especially for long, multi-day traverses.
The other thing is I don’t know how clean the pivot action would be if you used the plates to skin. You would also be higher with the plates which might reduce your pivot angles and control (but then that’s no different to soft boots and bindings and they seem to work for most people).
The Dynafit toe pieces do weigh next to nothing though (not sure of exact weight) and sometimes that little bit of extra weight is worth the enormous gains in practicality and comfort….. That’s how I tend to think….
Hope that helps!
Hey Paul
We spoke a while ago, thanks for all your advice. I’ve taken the plunge with a Jones board, Voile SD Mtn Plates and my Radium boots and all in all I’m very happy with the set-up.
I do however find the ride pretty hard on really bumpy ground and I think it’s down to having no cushioning for shock absorption. Have you found this and have you got any suggestions?
I’ve thought about putting some kind of padding between the base plate and the binding but I haven’t tried it out yet and I’m not sure what would work.
Hey Martin,
Glad to hear you took the plunge I definintely know what you are talking about. When I first moved over to hard boots, I found it used to throw me around when I was on bumpy and hard snow (and throw me down). As you know, it all comes down to the stiffness of the boot more than the absorbtion properties. I have no experience with the Radiums, so I don’t know how stiff they are. In any case, what I decided to do was leave the top buckle pretty much open on my boots and get the support soley from the velcro booster strap that goes around the top of the boot. I don’t even do that up tight. Just enough to get the support that I need and no more. Takes a bit of playing around until you get it as you like it.
When I first got my boots, I made a point of using them as they were supposed to be used…. but then I realised they were made for skiing And it didn’t matter if I didn’t do it the correct way. So I do all the buckles up pretty lightly (without my feet swimming in them), so there is the minimal amount of pressure and leave the top buckle undone. I changed the tongue on mine boot too to a much softer one which made a big difference.
Basically, the only difference between the hard boot and the soft boot is “the give” which is why they feel pretty hard on bumpy ground. Loosen the cuff of your boot and the shock will be dispersed by the increased articulation around your ankle and lower leg and a lot less will go into the boot and it will feel just like a soft boot. At least my do.
Let me know how you get on.
Pingback: Přechod z měkkého na tvrdé deskové vázání | Climb & Splitboard !
Pingback: Splitboarding 101 - A Beginner's Guide to the Gear they'll Need - Biglines